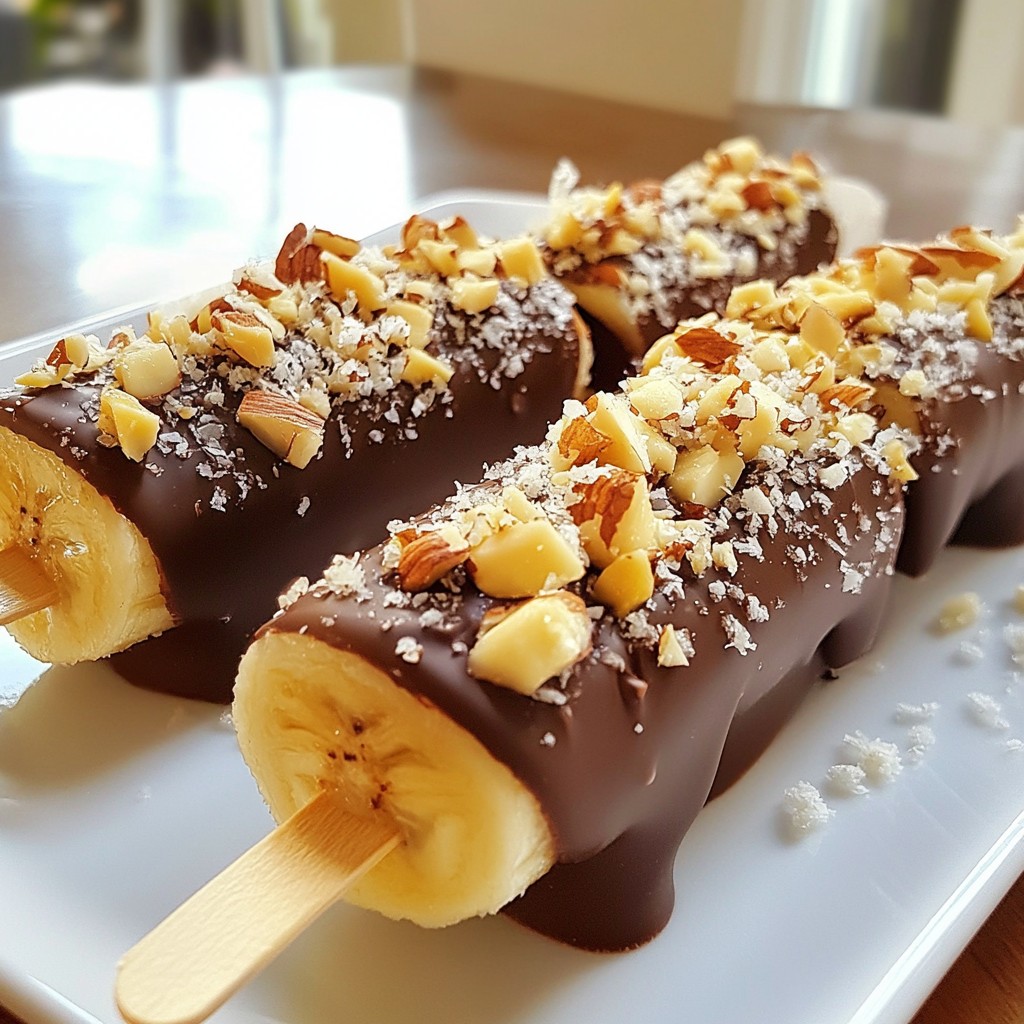
Are you ready for a fun and tasty treat? Chocolate-covered banana pops are simple to make, and they are perfect for kids and adults alike. With just a few ingredients like ripe bananas and dark chocolate chips, you can whip these up in no time. Whether you want to add nuts or coconut for crunch, this treat will surely please your taste buds. Let’s dive into making these delightful snacks!
Why I Love This Recipe
- Quick and Easy: This recipe takes just 15 minutes to prep, making it a perfect treat for any occasion!
- Healthier Indulgence: With ripe bananas and dark chocolate, these pops are a guilt-free dessert option packed with nutrients.
- Customizable Toppings: You can switch up the nuts and coconut or even add sprinkles for a personal touch!
- Fun for All Ages: These Choco-Banana Bliss Pops are a hit with kids and adults alike, making them great for family gatherings.
Ingredients
List of Essential Ingredients
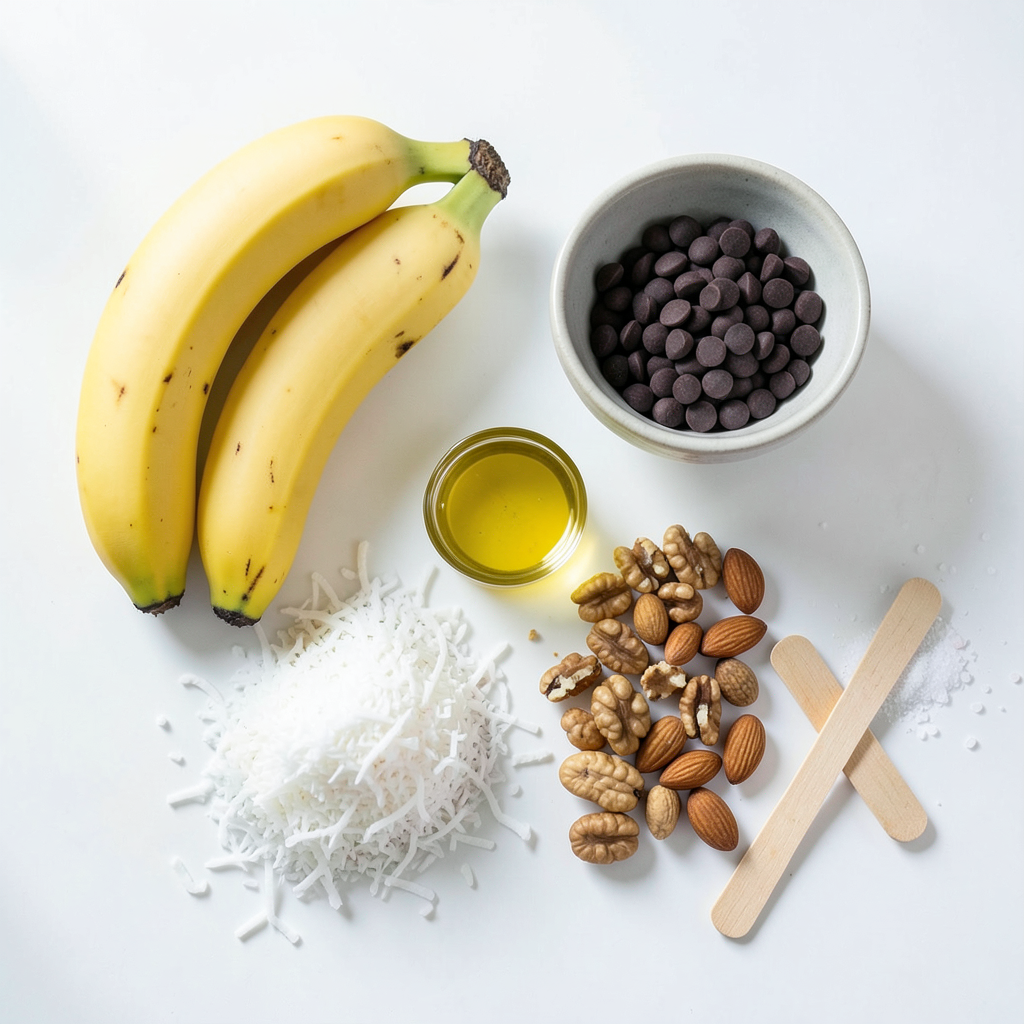
- 4 ripe bananas
- 1 cup dark chocolate chips
- 1 tablespoon coconut oil
For this treat, ripe bananas are key. They provide sweetness and a creamy texture. Dark chocolate chips give a rich chocolate flavor. Adding coconut oil helps the chocolate melt smoothly and coat the bananas well.
Toppings and Add-Ons
- 1/2 cup crushed nuts (almonds, walnuts, peanuts)
- 1/4 cup shredded coconut (unsweetened)
- 1/4 teaspoon sea salt
Toppings make your banana pops extra fun. Crushed nuts add crunch and flavor. You can use almonds, walnuts, or peanuts based on your taste. Shredded coconut adds a tropical twist. A sprinkle of sea salt balances the sweetness.
Equipment Needed
- Popsicle sticks
- Baking sheet
- Parchment paper
- Microwave-safe bowl
You need a few tools to make these pops. Popsicle sticks help you hold the bananas. A baking sheet lined with parchment paper makes for easy cleanup. A microwave-safe bowl is essential for melting the chocolate.
Step-by-Step Instructions
Preparing the Bananas
To start, peel each banana carefully. This keeps the fruit intact. Cut the bananas in half crosswise. This gives you two banana pieces per banana. Next, take a popsicle stick and insert it into the cut end of each banana half. Push it in gently so it stays put. Place the banana pops on a baking sheet lined with parchment paper. This helps with easy cleanup later.
Melting the Chocolate
Now, let’s melt the chocolate. Grab a microwave-safe bowl and add 1 cup of dark chocolate chips. Add 1 tablespoon of coconut oil to the bowl. The coconut oil makes the chocolate smooth and shiny. Microwave the bowl in 30-second bursts. Stir the chocolate after each interval. Keep going until the chocolate is fully melted. It should be smooth and easy to dip.
Coating and Freezing
Once your chocolate is melted, it’s time to coat the bananas. Dip each banana half into the chocolate. Make sure to cover it well. Let any extra chocolate drip off before placing it back on the parchment paper. While the chocolate is still wet, sprinkle your toppings. You can use crushed nuts and shredded coconut. A light sprinkle of sea salt adds a great flavor. After coating all the bananas, put the baking sheet in the freezer. Freeze them for at least 1 to 2 hours. This will make the chocolate firm and delicious.
Tips & Tricks
Perfecting the Chocolate Coating
To avoid chocolate clumping, use good quality chocolate chips. Mix in a little coconut oil. This helps the chocolate melt smoothly. Always melt chocolate in short bursts in the microwave. Stir after each burst. This keeps it from burning and clumping.
For an even coat, dip the banana half into the chocolate. Let any extra chocolate drip back into the bowl. This keeps the coating nice and smooth. Be quick! You want to sprinkle toppings while the chocolate is still wet.
Enhancing Flavor Profiles
You can make your banana pops even better with extra toppings. Try adding crushed nuts or shredded coconut. They add a nice crunch and flavor. If you like, mix in some colored sprinkles for fun. You can also try using flavored chocolate. Milk chocolate is sweeter, while white chocolate is creamy. Both add a new twist to your treats.
Presentation Ideas
Serve your banana pops on a rustic board or a bright plate. This makes them look more inviting. You can also garnish with extra nuts and coconut. A sprinkle of sea salt adds a nice touch. For a fun look, use colorful sticks or plates. This makes your sweet treat stand out at any gathering.
Pro Tips
- Choose Ripe Bananas: For the best flavor and texture, select bananas that are ripe but not overly brown. They should be slightly soft to the touch.
- Use Quality Chocolate: Opt for high-quality dark chocolate for a richer taste. You can also experiment with different types of chocolate, like milk or white, for variety.
- Experiment with Toppings: Feel free to mix and match toppings! Try adding sprinkles, chia seeds, or dried fruits for unique flavor combinations.
- Storage Tips: To prevent the pops from sticking together, place parchment paper between layers when storing them in a container in the freezer.
Variations
Healthier Alternatives
You can make your chocolate-covered banana pops even better. Use dark chocolate or sugar-free chocolate to cut some sugar. Dark chocolate has antioxidants. It’s a tasty choice! You can also try different toppings. Seeds, like chia or sesame, add crunch. Dried fruits, like raisins or cranberries, give a sweet twist.
Flavor Combinations
Try mixing in some spices for fun flavors. A pinch of cinnamon can warm up the chocolate. If you want a kick, add a bit of cayenne pepper. You can also change up the fruits. Strawberries or kiwi are great options. They add a fresh taste and color to your pops.
Seasonal Twists
Make your pops festive for any holiday. Use colorful sprinkles on top for fun. You can also use seasonal fruits, like pumpkin in the fall or berries in summer. This keeps your treats exciting and fresh!
Storage Information
Freezing Techniques
To keep your chocolate-covered banana pops fresh, follow these tips:
- Make sure the pops are fully frozen before storing.
- Place them in a resealable bag or airtight container.
- Label the bag with the date.
You can store them in the freezer for up to two months. This keeps the bananas firm and the chocolate smooth.
Thawing and Serving Tips
To thaw banana pops quickly, remove them from the freezer and let them sit at room temperature for about 5-10 minutes. If you need them faster, you can run them under warm water for a few seconds.
Once thawed, you can serve them plain or drizzle with extra chocolate. They also taste great with whipped cream or fresh fruit.
Shelf Life and Quality Checks
Watch for these signs of spoilage:
- Ice crystals forming on the chocolate.
- A change in the banana's texture or color.
To maintain freshness, always keep the pops sealed tightly in the freezer. Enjoy them soon for the best taste!
FAQs
Can I use different types of chocolate?
Yes, you can use white and milk chocolate for your banana pops. Each type brings a unique taste. White chocolate gives a sweet and creamy flavor, while milk chocolate adds a rich and smooth touch. Just melt them the same way you melt dark chocolate. You can even mix chocolates for a fun twist. Exploring different chocolates lets you find your favorite taste.
How long can chocolate-covered banana pops last in the freezer?
Chocolate-covered banana pops can stay fresh in the freezer for about two months. To keep them at their best, store them in a resealable bag or a tight container. Make sure to label it with the date. This way, you won't forget when you made them. The chocolate should stay firm, and the bananas will taste great if stored correctly.
Are there any nut-free alternatives for toppings?
Yes, you can use many nut-free toppings. Try using seeds like pumpkin or sunflower seeds for a crunchy texture. You can also use sprinkles for a fun pop of color. Shredded coconut is another great option. If you want to add flavor, try using mini chocolate chips or even a drizzle of caramel. These alternatives allow everyone to enjoy the treats without worry.
You learned how to make delicious chocolate-covered banana pops. We covered key ingredients, from ripe bananas to dark chocolate. I shared tips for coating, freezing, and enhancing flavors. You can also explore fun variations and know how to store them. Experiment with your favorite toppings to find what you love. Enjoy creating and sharing these treats with friends and family. Simple, tasty, and fun, these pops are a great treat for everyone!