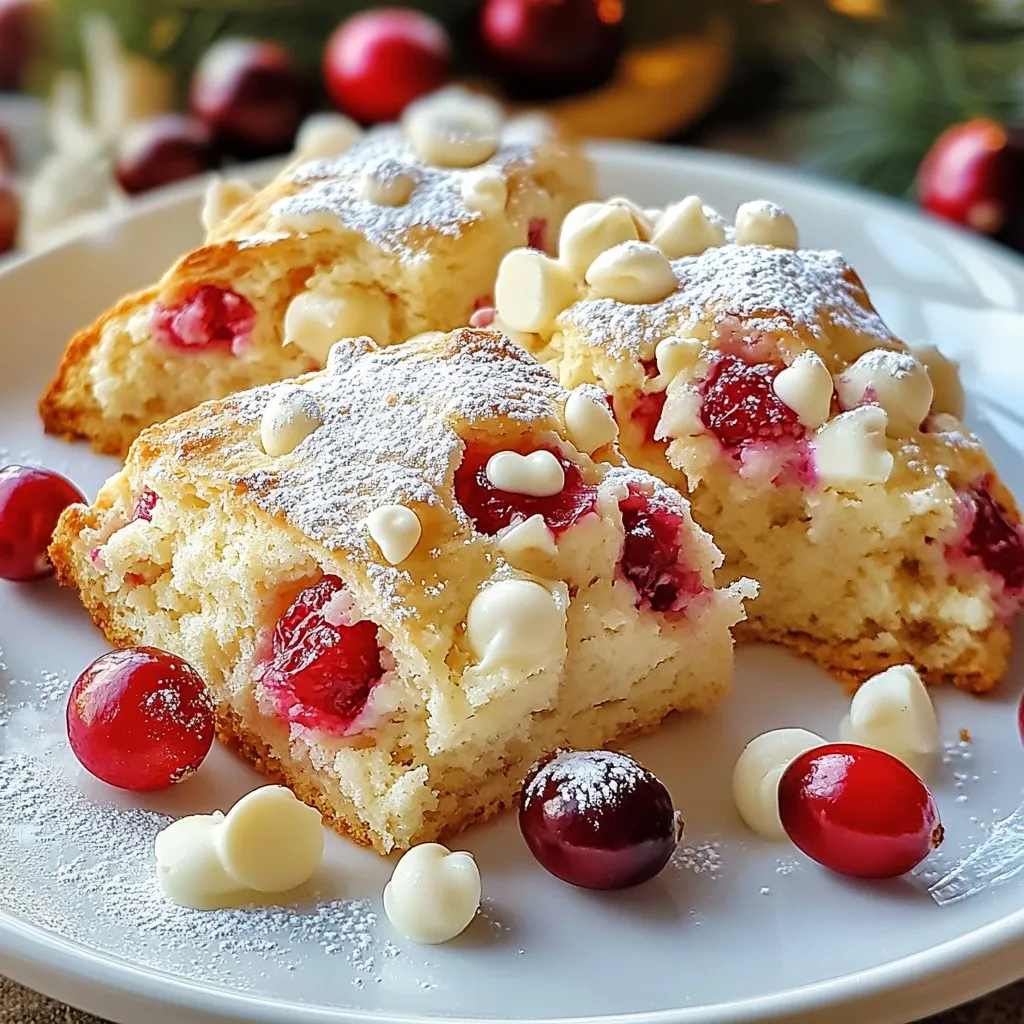
Craving a sweet and tangy treat? Look no further! My Cranberry White Chocolate Scones are a must-try. They combine tart cranberries with sweet white chocolate, creating a perfect blend of flavors. In this post, I’ll show you how to make these delicious scones step-by-step. You’ll discover essential tips, tasty variations, and storage ideas to keep them fresh. Let’s dive into making these delightful treats together!
Why I Love This Recipe
- Delicious Flavor Combination: The tartness of cranberries paired with the sweetness of white chocolate creates a delightful balance in every bite.
- Easy to Make: This recipe is straightforward and perfect for bakers of all skill levels, making it a great choice for a quick treat.
- Perfect for Any Occasion: These scones are not only great for breakfast but also make an excellent addition to brunch or holiday gatherings.
- Beautiful Presentation: With a dusting of powdered sugar and a few decorative cranberries, these scones look as good as they taste.
Ingredients
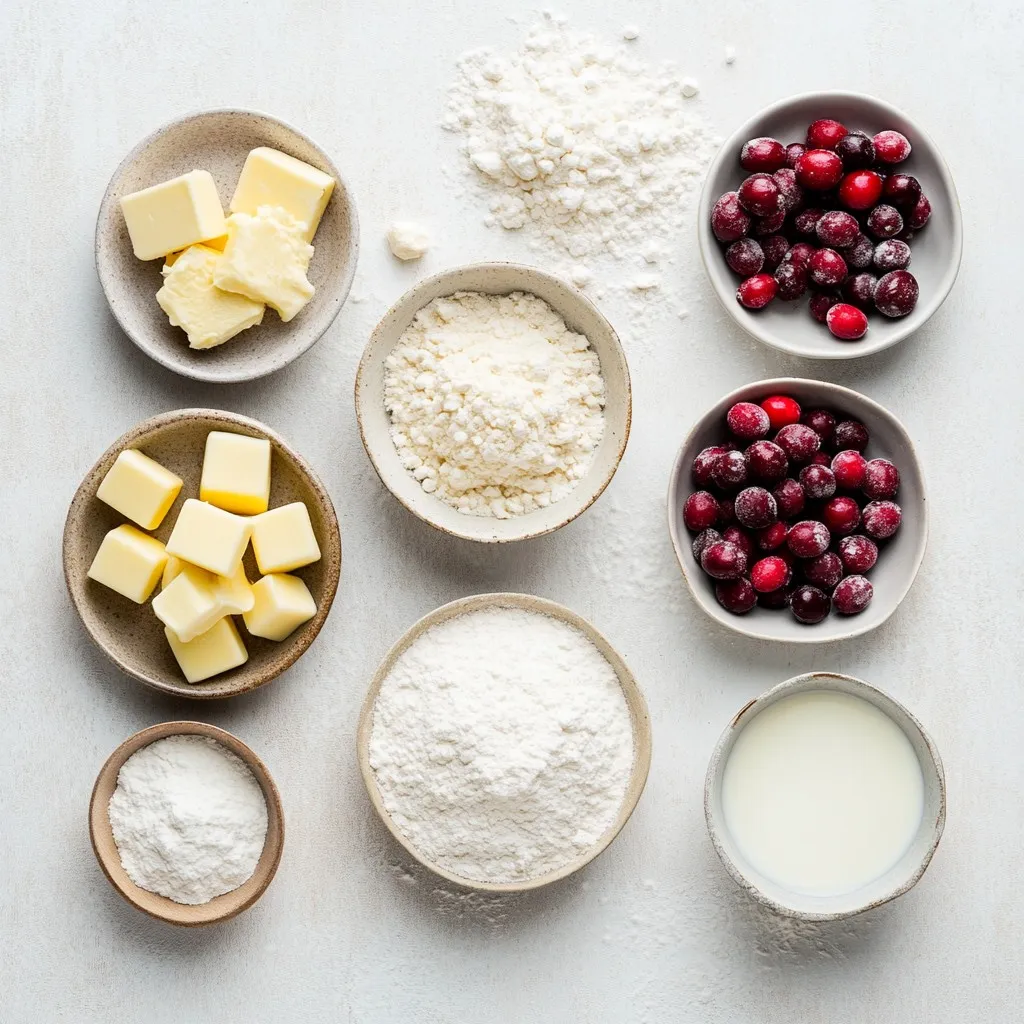
To make delicious cranberry white chocolate scones, you need fresh ingredients. Here’s what you will need:
– 2 cups all-purpose flour
– 1/4 cup granulated sugar
– 1 tablespoon baking powder
– 1/2 teaspoon salt
– 1/4 cup cold unsalted butter, cubed
– 1/2 cup whole milk
– 1 large egg
– 1 teaspoon vanilla extract
– 1 cup fresh or dried cranberries
– 1/2 cup white chocolate chips
– Extra milk or cream for brushing the top
Having these ingredients ready will make the cooking process smooth and fun. Each one plays a key role in creating the perfect scone. The flour gives structure, while butter adds flakiness. The sugar balances the tartness of cranberries. The white chocolate chips bring a sweet touch to each bite.
Make sure to use cold butter. This helps create tender scones. Fresh cranberries work best, but dried ones are fine too. The choice is yours!
Now, gather these ingredients and get ready to bake. You will enjoy every step of this process. Trust me, the taste is worth it!
Step-by-Step Instructions
Prepping the Oven and Baking Sheet
First, set your oven to 400°F (200°C). This step heats the oven well. Next, take a baking sheet and line it with parchment paper. This helps the scones not stick and makes clean-up easy.
Mixing Dry Ingredients
In a big bowl, add 2 cups of all-purpose flour, 1/4 cup of granulated sugar, 1 tablespoon of baking powder, and 1/2 teaspoon of salt. Use a whisk to mix these dry ingredients well. This ensures even flavor in each bite of your scones.
Incorporating Wet Ingredients
In another bowl, whisk together 1/2 cup of whole milk, 1 large egg, and 1 teaspoon of vanilla extract. Mix until smooth. This blend adds moisture and flavor to the dough. Pour this wet mix into the dry ingredients. Stir gently with a spatula until just combined. Avoid overmixing to keep the scones light.
Shaping and Cutting the Dough
Turn the dough out onto a lightly floured surface. Knead it gently a few times. Form the dough into a disk that is about 1 inch thick. Now, cut this disk into 8 wedges, like slicing a pizza. Place the wedges on the prepared baking sheet, leaving space between them.
Baking the Scones
Brush the tops of the scones with a little extra milk or cream. This gives them a nice golden finish. Bake the scones in the preheated oven for 15-20 minutes. They should turn lightly golden. A toothpick inserted in the center should come out clean. Once baked, take them out and let them cool slightly on a wire rack before serving. Enjoy your tasty treat!
Tips & Tricks
Ensuring Perfect Texture
To get the best texture in your scones, start with cold butter. This keeps the scones flaky and light. Cut the butter into small cubes before adding it to the flour mix. Use your fingers or a pastry cutter to blend. Stop mixing when you see small crumbs. Overmixing makes the dough tough.
Optional Add-ins and Substitutions
You can customize your scones with fun add-ins. Try nuts like pecans or walnuts for crunch. For extra flavor, add orange zest or cinnamon. If you want to swap the white chocolate, use dark chocolate instead. You can also use dried cranberries if fresh ones aren’t available. Just keep the amount the same.
Brushing Techniques for Golden Finish
Brushing the tops of your scones is key for a nice color. Use milk or cream for this step. It helps create a golden crust. Apply it gently with a pastry brush before baking. This little touch makes your scones look more appealing.
Pro Tips
- Chill the Dough: For a flakier texture, chill the dough for 15-20 minutes before cutting into wedges. This helps the butter firm up, leading to a better rise during baking.
- Fresh Ingredients: Use fresh cranberries for a burst of tartness and vibrant color. If using dried cranberries, consider soaking them in warm water or juice for 10 minutes to plump them up.
- Don’t Overmix: Gently mix the wet and dry ingredients until just combined. Overmixing can lead to tough scones, so be careful to keep it light.
- Perfect Bake: Keep an eye on the scones as they bake. Every oven is different; start checking at the 15-minute mark to avoid overbaking.
Variations
Using Different Fruits
You can change the flavor by using different fruits. Try blueberries, raspberries, or cherries. Each fruit brings a unique taste. You can also mix dried and fresh fruits. For example, combine cranberries with chopped figs or apricots. This choice adds sweetness and texture.
Alternative Chocolate Choices
White chocolate is popular for these scones, but you can switch it up. Dark chocolate or milk chocolate chips work well too. Each chocolate type gives a different flavor. For a fun twist, try adding cocoa powder to the dough. This will make the scones richer and more exciting.
Gluten-Free Substitution Options
For a gluten-free version, use a gluten-free flour blend. Make sure the blend has a good mix of starches and proteins. You may need to add a little xanthan gum for better structure. This helps the scones rise and stay fluffy. Always check the other ingredients to ensure they are gluten-free too.
Storage Info
How to Store Leftovers
To keep your scones fresh, place them in an airtight container. You can store them at room temperature for up to two days. If you want them to last longer, place them in the fridge. They will stay fresh for about a week this way.
Freezing Instructions
You can freeze these scones for later use. First, let them cool completely. Then, wrap each scone in plastic wrap. Place the wrapped scones in a freezer-safe bag. They will stay good for up to three months. When you want to enjoy them, just thaw them in the fridge overnight.
Reheating Guidelines
To reheat your scones, preheat your oven to 350°F (175°C). Place the scones on a baking sheet. Heat them for about 10 minutes, or until warm. You can also microwave them for about 15-20 seconds. Enjoy your scones warm for the best taste!
FAQs
How long do Cranberry White Chocolate Scones last?
Cranberry White Chocolate Scones last about 2 to 3 days when stored properly. Keep them in an airtight container at room temperature. If you want to keep them longer, you can freeze them. They stay fresh in the freezer for up to 3 months.
Can I use dried cranberries instead of fresh?
Yes, you can use dried cranberries instead of fresh. Dried cranberries add a sweet and chewy texture. Just use the same amount, one cup, as you would with fresh cranberries. If you prefer a more tart flavor, you can soak dried cranberries in warm water for 10 minutes before adding them to the dough.
What can I serve with Cranberry White Chocolate Scones?
You can serve Cranberry White Chocolate Scones with many tasty options. Pair them with clotted cream or butter for a rich taste. Jam or honey adds a sweet touch too. A cup of tea or coffee complements these scones well, making a perfect snack or breakfast.
How do I know when the scones are done baking?
You will know the scones are done when they turn lightly golden on top. Insert a toothpick in the center; it should come out clean. Baking usually takes 15 to 20 minutes. Keep an eye on them during the last few minutes to avoid over-baking.
Cranberry white chocolate scones are simple and fun to make. We covered ingredients, steps, and tips for success. You learned how to store and reheat them too. With variations and FAQs, you now have all you need for perfect scones. Enjoy these delightful treats with family and friends. Baking brings joy and satisfaction, so get started in your kitchen toda